- Continue Shopping
- Your Cart is Empty
How To: Installing A Headset
In this MTB How To, we are going to be installing a new headset! Whenever you are replacing the headset on your mountain bike, it is very important to align the headset cups and bearings properly and apply grease in just the right places. Here we are going to be walking you through step by step to ensure you get the most life out of your headset. No one likes a creaky headset!
Here we will be installing a Cane Creek 110 series headset on to a Santa Cruz V10. All of Cane Creek's 110 series models are designed, machined, assembled, and tested right in Fletcher, North Carolina. American Made! The specific model headset used is a Cane Creek 110 ZS49/28.6 / ZS49/30.
What Tools Do We Need?
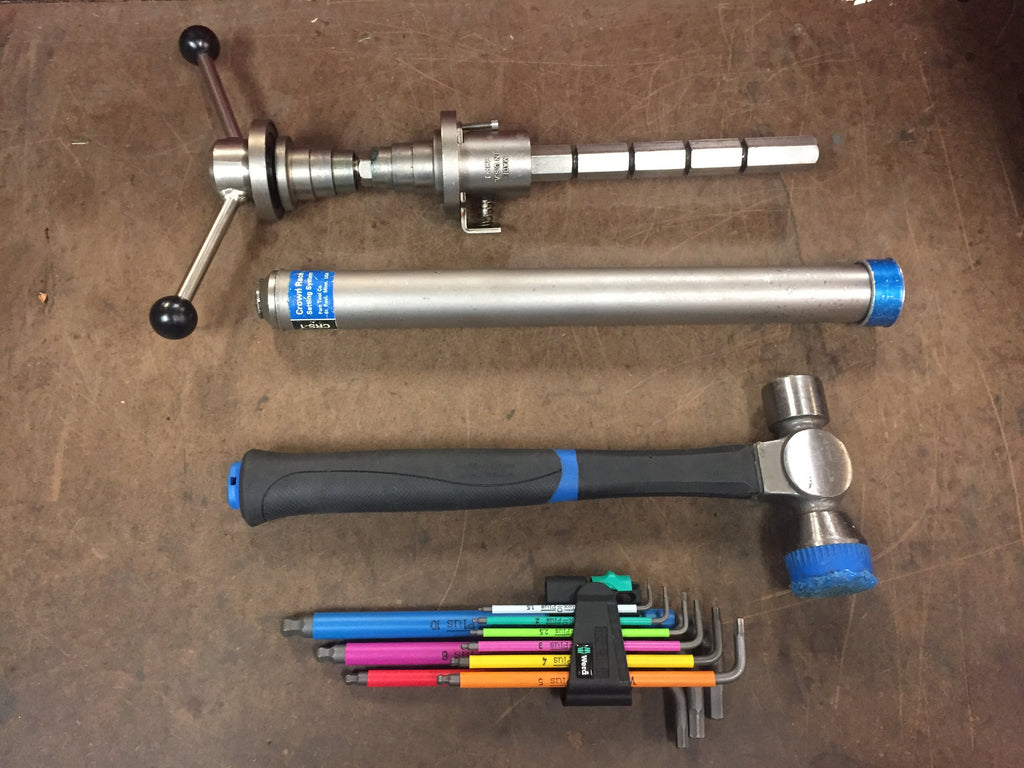
Before we start, let's go over what tools will be necessary to get the job done just right. In order to get a perfect install, we will be using a Park Too HHP-2 Headset Press. We would not recommend using a rubber mallet as an alternative but will say it can be done. Next we have a Park Tool Crown Race Setting System and Park Tool mallet to install crown race safely. For grease, we like to use Maxima's waterproof grease. Lastly, you will need a good set of allen keys. Thanks to the guys at Old Spokes Home bike shop in Burlington, Vermont for letting us use the tools for this MTB How To.
1. Install Crown Race
- First we are going to start off installing the crown race on to the steerer tube. The crown race is what meshes the steerer tube and the bottom bearing of the headset. It is important to make sure the race gets pressed all the way down onto the crown. The crown shown below is for a Fox 40 fork and that is why the fork has been removed from the crown. The same technique can be applied to a single crown fork.
- Apply a thin film of grease onto the inner ring of the race so that it slides in to place with ease. It is also smart to apply minimal grease on the rubber gasket on top of the race to prevent from it from being damaged while being installed. Using the Park Tool mallet, hit the top of the Park Tool Crown Race Setting Tool until the race is flush with the top of the crown.
2. Make Sure The Head Tube and Headset Are Clean
-
Inspect the condition of the head tube on your bike. Use any type of rag or shop towel to clean the inside of the headtube so that no debris has a chance of getting to the headset from the inside.
- Also take a quick glance at the headset before you install it. Double check to make sure you have the correct headset to fit your bike.

3. Grease The Top And Bottom Headset Cups
- The next step is make sure everything is properly greased before pressing in the headset cups themselves. We like to use Maxima Waterproof Grease, and with any kind of applicator, apply a thin layer of grease on both headset cups and the dust cap as shown below.
- On the dust cap specifically, it is easy to apply too much grease. When the headset is filled with too much grease, some will make it out the side of the top cap and start to collect dirt when riding. The Maxima grease is great because it likes to stick around even after washing your bike.
4. Press In The Top Cup
- Now here it goes. It's time to use the Park Tool HHP-2 Headset Press. We always recommend installing one headset cup at a time. This makes it much easier to ensure the headset cups are each aligned properly. This is even more relevant for those installing an offset headset.
- First place the top headset cup in to place and aligned correctly. Slide the Park Tool Headset Press in to place and slide the bottom collar up until it clicks in to position. Tighten the handle snug until the headset cup is flush with the top of the head tube. Make sure that as the headset cup is sliding in it remains straight.
5. Press In The Bottom Cup
- Repeat the same process described above and press in the bottom headset cup. Again make sure that the cup is pressed in straight. Tighten the Park Tool Headset Press until things are snug and the headset is flush with the headtube. The orientation of the headset press can remain the same while installing both the top and bottom headset cups.
6. Assemble Headset
- Now that the headset cups have been installed, it's time to assemble the rest of the headset. Start by applying a thin layer of grease on to each of the bearings and pushing those in to place. If you haven't already, grease the dust cap and place it on top of the headset. The 110 series headsets from Cane Creek also come with a gold lock ring. Be sure to include the lock ring before installing any headset spacers.

7. Insert Fork and Tighten Top Cap
- Almost there! Throw just a touch of Maxima grease around the crown race and slide the steerer tube through the headset. Press the dust cap down onto the steerer tube to get a tight fit. The steerer tube here has already been cut to length and a star nut installed.
- Because the fork being used here is a dual crown, the top crown also acts like a stem spacer. Slide the top crown down on to the steerer tube. Place the appropriate spacers on to the steerer tube and then tighten the top cap. The spacers should come to at least 1/4" above the top of the steerer tube for the headset to tighten properly. If the fork/handlebars are reluctant to turn back and fourth, the top cap may be too tight. A snug fight, not overtightened, will extend the life of your headset bearings.

8. Go Ride Your Bike!
Max Morgan Racing in Colombia, South America for the Pan American Championships


